After browsing Pinterest and Google for a while looking for a good DIY royal throne prop tutorial, I realized there are none! Here's a fairly easy, cheap way to make a royal throne.
A friend of mine required a royal throne for the king in a movie she was filming. I was assigned the task of making a low-budget throne. The total cost was probably about $14, but I did use a bunch of stuff I found we already have laying around the house that you may not have. Still, even with buying all the supplies, this throne shouldn't exceed $25 for total cost.
First, I bought a chair. I hit several thrift stores and kept an eye out for yard sales until I found a cheap chair, about $5. Any chair with cushions and arms will work. (Just keep in mind the color of the cushion will be on the final throne. You could probably drape a sheet or tablecloth over the finished throne, but I'm not sure how that would look.)
Next, I found some leaf-molds in our bin of cookie-cutters. If you don't have any clay molds, candy molds, or anything that would make a nice design, you could probably get one fairly inexpensively at any craft or cooking store. To make the leaves, I made some air-dry clay (clay recipe) and pressed it into the leaf molds. Then I left them for about a day until they dried then popped them out.
To give the chair a fancier look, I used two toy bears to glue on top of the chair. I got these for about $3 each at Hobby Lobby, but I'm sure any craft store or even a dollar store would have toy animals. Choose whatever one you like best! You'll spray paint them later, so they look like they were carved out of the chair.
Now you're ready to decorate the chair! It would probably be best to sand the chair a little wherever you are going to glue something on. I didn't do this and things kept falling off whenever I moved the chair or accidentally bumped them.
Glue the clay leaves on the arms and wherever you think they'll look good. I used quick-dry craft glue, but hot glue might work better if you sanded it first. (The hot glue wasn't sticking to the wood for me since I skipped the sanding.)
You can also glue anything round along the sides of the legs. I used the round mancala marble things, not sure what those are called! (:
Next, I used a big piece of board to use as the back of my throne. I happened to have a perfectly sized piece in the basement, and just cut the corners off to make a nice point. If you don't have anything you could use lying around, any big piece of plywood, poster board, or even cardboard would work well. Just make sure it's stiff enough to stand on its own.
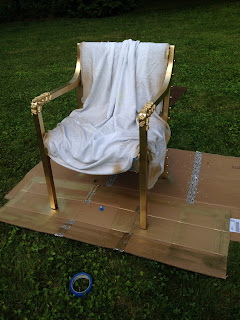
Now, the fun part! Spray paint everything!
I covered the cushion with an old sheet so I wouldn't get paint on it. Make sure you get all the tricky little spots! I missed a bunch of spots the first time and had to lug the chair back out for another coat.
Now we're almost done!
I used gorilla glue to glue the bears on, but superglue or hot glue might work as well. Then I used drywall screws to secure the backboard onto the chair. You could also paint the backboard brown instead of gold if you'd prefer the wood look!
And voila! A throne fit for a king.
(Don't mind the glue bottle, it was keeping the bear in place while the glue dried)


I am going to use some of your tips to make a throne for an upcoming event. But I think I will pad the board and recover the back and seat so that the highest part of the chair looks apolstered to match the chair. Then I will add a wooden crown on top that is spray painted gold and covered in stones. Might also add more blingy to the wooden part of the front of the arms and pad out the upper part for more cushion for the person who will be forced to sit there.
ReplyDeleteSounds like some great ideas! I'd love if you posted a photo of how if came out with the adjustments (:
Delete